Have you ever wondered what contour makeup is and how it can transform your face? Well, look no further! In this article, we’ll delve into the world of contouring, a technique that uses light and dark foundation shades to enhance your facial features. You’ll discover the benefits of contouring, different techniques to try, and the products and tools you need for flawless results. Get ready to embrace your inner artist and create a stunningly sculpted face with contour makeup!
The History of Contour Makeup
Contour makeup has a fascinating history that you’ll find interesting. Over the years, contouring has become a popular beauty trend, especially in the fashion industry. Many famous celebrities and models have showcased stunning contouring looks on runways and red carpets. The technique of contouring is not limited to one culture; it has been embraced by different cultures around the world. Each culture puts its own unique spin on contouring, using various techniques and products to enhance their facial features. Contouring has also made its mark in pop culture, with many iconic makeup looks becoming trends. From Kim Kardashian’s signature contoured look to drag queens’ transformative contouring skills, this makeup technique has become a staple in the beauty industry and continues to evolve with new trends and innovations.
Benefits of Contouring Your Face
Using contour makeup can help you achieve a more defined and sculpted appearance by enhancing your facial features. Here are some benefits of contouring your face:
- Contouring trends: Contouring has become a popular beauty trend, with people using it in their daily routines to enhance their natural beauty.
- Contouring for different skin tones: Whether you have fair, medium, or dark skin tone, contouring can be customized to suit your specific complexion and bring out your best features.
- Contouring hacks: There are various contouring techniques and hacks that can help you achieve the desired effect, such as using bronzer or matte eyeshadow for a more subtle contour.
- Contouring for special occasions: Contour makeup is especially useful for special occasions like weddings or parties where you want to look extra glamorous and have your features stand out in photographs.
Different Techniques for Contouring
To achieve different effects with your facial features, try experimenting with various techniques for highlighting and shading. Contouring is not limited to just one method. There are several contouring techniques that you can explore to enhance your natural beauty. One popular technique is highlighting and shading, which involves using lighter and darker shades of foundation to create dimension on the face. Another technique is strobing and contouring, where you focus on highlighting the high points of your face while still adding subtle definition. The draping technique involves using blush to contour the cheeks and temples, giving a soft and flushed appearance. For those who prefer non-traditional methods, there are multi-dimensional contouring techniques that combine different textures and colors for a unique effect. So don’t be afraid to step outside the box and discover new ways to contour your face!
Contouring for Different Face Shapes
When determining the best contouring technique for your face shape, consider the natural angles and proportions of your features. Here are some key tips to help you contour for different face shapes:
- Round Face: Use contouring techniques to create more definition along the jawline and temples. Apply a darker shade of foundation or bronzer in these areas to add depth and slim down the face.
- Square Face: Focus on softening the strong angles of a square face by contouring along the hairline, temples, and jawline. Blend well to create a more oval-shaped appearance.
- Heart-Shaped Face: Contour under the cheekbones and along the sides of the forehead to balance out a heart-shaped face. This will help create a more symmetrical look.
- Oval Face: An oval face shape is considered ideal for contouring because it already has balanced proportions. Focus on enhancing your favorite features, such as high cheekbones or a defined nose.
Remember to adapt your contouring techniques based on your skin tone, occasion, and age (for mature skin). With practice and experimentation, you’ll find what works best for you!
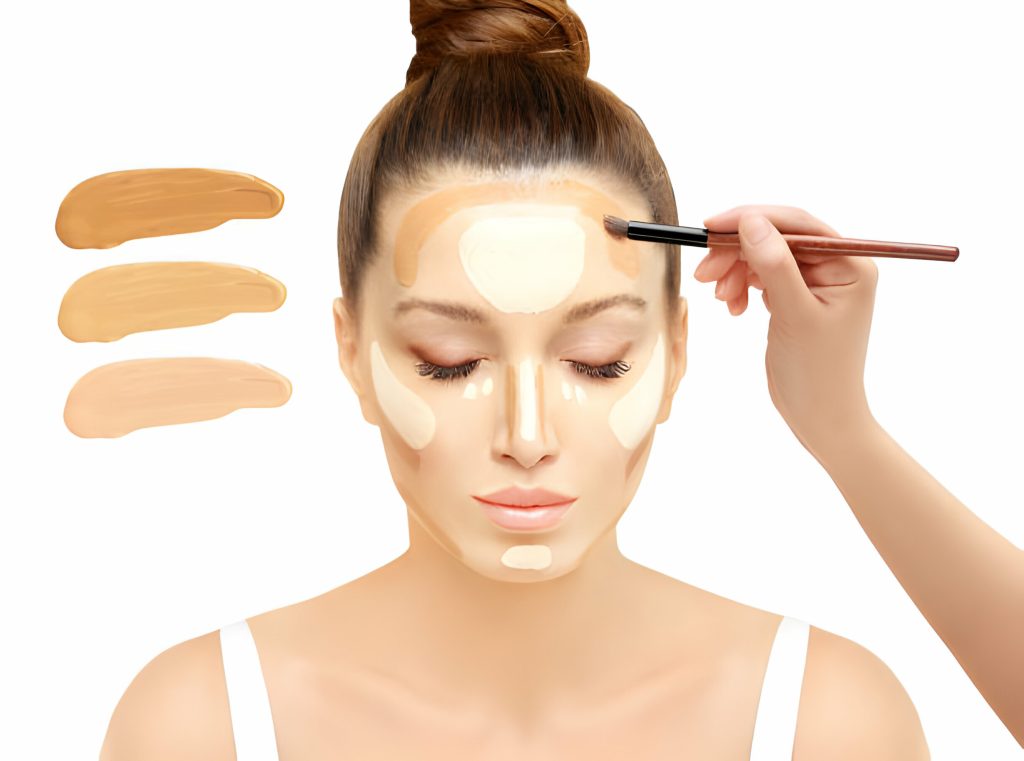
Contouring Products and Tools You Need
Invest in the right tools and products to achieve a flawless contour. When it comes to contouring, having the right products and brushes can make all the difference. There are a variety of contouring products available, such as cream or powder-based options, so choose one that suits your skin type and preference. Contouring brushes are essential for precise application and blending. Look for brushes with angled bristles to help create sharp lines and defined contours. If you’re new to contouring, there are plenty of tutorials available online that can guide you through different techniques step-by-step. These tutorials cater specifically to beginners, providing helpful tips and tricks along the way. With the right tools, products, and tutorials at your disposal, you’ll be able to master the art of contouring in no time.
Step-by-Step Guide to Contouring Your Face
Start by moisturizing your face and applying a face primer to create a smooth base for your contouring. Here are some helpful tips for beginners when it comes to contouring:
- Choose the right shades: Pick a contour shade that is two shades darker than your skin color. Consider your undertone (cool or warm) when choosing the shade, and make sure it complements your skin tone.
- Use the right tools: Invest in an angled brush for sculpting and blending, and use a makeup sponge for seamless blending. A fluffy brush is great for setting your contour with powder.
- Know your face shape: Identify your face shape before contouring so you can focus on enhancing specific features like jawline, cheekbones, or nose accordingly.
- Avoid common mistakes: Blend well to avoid harsh lines, start with a light hand and build up gradually, and always remember to highlight the high points of your face after adding shades.
Contouring can be a game-changer for special occasions or photoshoots, but don’t forget that less is more! With practice and these techniques in mind, you’ll be able to achieve a beautifully sculpted look without any mistakes.
Common Mistakes to Avoid When Contouring
Blending well is crucial to avoid harsh lines and achieve a seamless contour. When it comes to contouring, there are common mistakes that you should avoid. One of the biggest missteps is using the wrong shade of contour or applying it too heavily. Using a contour shade that is too dark can make your face look muddy and unnatural. Another pitfall is not blending properly. Failing to blend your contour well can result in visible lines on your face, which defeats the purpose of creating a natural-looking shadow. Additionally, applying too much product at once can lead to an overly dramatic effect that may not be suitable for everyday wear. To avoid these contouring blunders, start with a light hand and gradually build up the intensity as needed. Remember, less is often more when it comes to achieving a flawless contour.
Tips and Tricks for Flawless Contour Makeup Application
To achieve a flawless contour, remember to properly prep your skin with moisturizer and primer for a smooth base. Here are some tips and tricks to help you master the art of contouring:
- Contouring Techniques: There are various techniques you can use to contour your face, such as the “3” method, where you apply contour along the temples, under the cheekbones, and jawline. Experiment with different techniques to find what works best for you.
- Contouring for Beginners: If you’re new to contouring, start with subtle shades and build up gradually. Blend well to avoid harsh lines and practice in natural lighting for a more accurate application.
- Contouring Hacks: To make your contour appear more natural, choose shades that match your skin tone or go one shade lighter. Use a fluffy brush for blending and tap off excess product before applying.
- Contouring for Different Skin Tones: It’s important to choose contour shades that complement your skin tone. For fair skin, opt for cool-toned contours, while warm-toned contours work well on deeper skin tones.
Remember these tips when contouring for special occasions or everyday makeup looks to enhance your features and achieve a flawless finish.